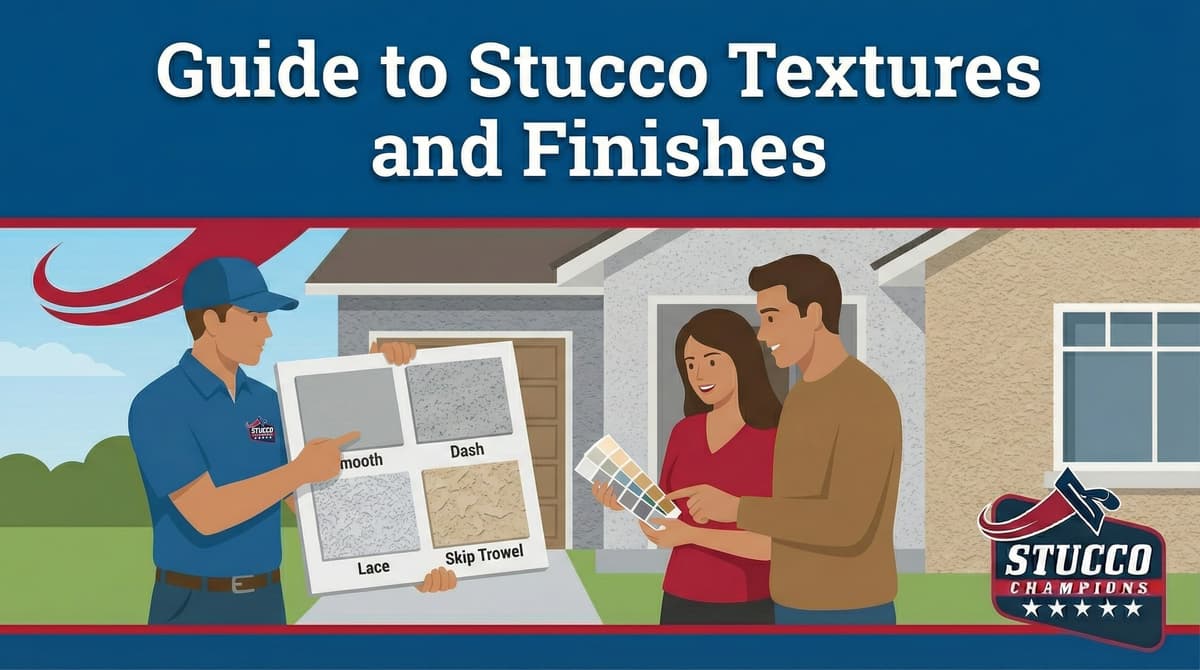
Guide to Stucco Textures and Finishes
Written by Stucco Champions — Southern California’s Authority on Exterior Plastering.
The Texture Guide: Defining Your Home’s Stucco Finish
Stucco is not a "one size fits all" material. The texture you choose defines the architectural character of your home, impacts maintenance costs, and determines how easy it will be to patch in the future.
In Southern California, we see everything from the glassy smoothness of a Santa Barbara finish to the heavy, rugged look of Spanish Lace. This guide demystifies the industry terminology so you can tell your contractor exactly what you want.
1. The "Big Three" (Most Common)
Free Assessment
Noticing Stucco Damage?
Get a free on-site assessment from a licensed contractor. $0 deposit, no obligation.
GET FREE ASSESSMENT1. Spanish Lace / Skip Trowel
The Look: The classic "California Stucco" look. It features a base coat with flattened "islands" or "clouds" of texture skipped over the top.
Best For: Hiding imperfections. Because the texture is irregular, it camouflages slight waves in the framing or patch repairs.
Maintenance: Very forgiving. Ideal for homeowners who plan to paint their stucco eventually.
2. Sand Finish (Float Finish)
The Look: A uniform, gritty texture that looks like sandpaper. It is crisp, modern, and clean.
Aggregate Types:
- Fine (20/30 Sand): Tighter, smoother look.
- Coarse (16/20 Sand): heavier grit, often used in commercial buildings.
3. Smooth Finish (Santa Barbara)
The Look: The "Ferrari" of stucco finishes. It mimics the look of interior plaster or old adobe, smooth to the touch with slight undulations.
Best For: High-end modern estates and Spanish Revivals.
The Risk: Smooth stucco will crack. Without the aggregate (sand) to relieve tension, hairline spiderwebbing is inevitable. It also shows every imperfection in the wall.
A true smooth finish is the most expensive option. It requires a "hard trowel" technique that takes significantly more labor hours than a rough texture. Additionally, patching a smooth wall is nearly impossible to hide without recovering the entire wall.
Choosing a texture for your project? Preview it on a real home with our Stucco Visualizer.2. Specialty & Custom Textures
Dash Finish (Knockdown)
The Look: A rough, pebbled texture that is sprayed onto the wall using a hopper gun.
Application: Often used in tract housing or commercial buildings because it is fast to apply.
Pro Tip: Dash is the easiest texture to patch because the spray pattern breaks up the eye, making repairs blend seamlessly.
Cat Face (Montalvo)
The Look: A smooth surface interrupted by occasional rough "inclusions" or "peeks" of the underlying coat. It looks like a smooth wall that has been weathered.
Best For: Custom Tuscan or Mediterranean homes where "Old World" charm is desired.
Worm Finish (Swirl / Putz)
The Look: This retro style (popular in the 70s and 80s) uses large pieces of aggregate. When the float is rubbed in a circle, the large stones drag through the wet cement, leaving worm-like grooves.
Status: Rarely installed new, but often encountered during restucco projects.
3. Material Matters: Acrylic vs. Traditional
The texture you choose dictates which material we use:
- Traditional Cement (LaHabra/Omega): Best for Lace, Cat Face, and Santa Barbara. It allows for depth and "mottling" (color variation).
- Acrylic (Synthetic): Best for Sand Finish. Because it is a consistent polymer, it creates a perfectly uniform, stain-resistant sand texture. However, Acrylic looks "plastic" if you try to make it look like old-world plaster.
4. How to Choose?
Selection Checklist- Budget: Lace and Dash are the most affordable. Smooth is the premium.
- Maintenance: Smooth shows dirt and cracks. Rough hides dirt but catches dust.
- Style:
Modern/Contemporary: Smooth or Fine Sand.
Spanish/Tuscan: Lace, Cat Face, or Santa Barbara.
Commercial: Coarse Sand or Dash.
Worried about cracks in your new finish? Read Identifying and Repairing Stucco Cracks.
Trying to match an existing texture? Check out How to Match Stucco Color and Texture.
See How Different Textures Look on Your Home
Preview finishes before committing — or get a project cost estimate in 30 seconds.
Frequently Asked Questions About Stucco
How much does stucco repair cost in Orange County and Los Angeles?+
Stucco repair typically ranges from $500 for minor crack patching to $5,000+ for full re-stucco of a single elevation. The exact cost depends on the damage type (hairline cracks, water damage, delamination, weep screed failure), the square footage involved, and whether the original three-coat or one-coat stucco system needs to be matched. Stucco Champions provides fixed-price written estimates after a free on-site assessment — no hourly billing, no surprise change orders. See our stucco repair cost guide for detailed pricing by repair type.
How long does stucco last in Southern California?+
Properly installed three-coat stucco lasts 50-80+ years in Southern California's climate. The most common failure points aren't the stucco itself — they're the supporting components: corroded weep screed, deteriorated building paper behind the stucco, and improperly sealed window flashing. Most "stucco failures" are actually moisture-intrusion failures that start at one of these points. Annual visual inspection catches problems before they spread, which is why we offer free weep screed assessments for homeowners in our service area.
Can I repair stucco myself, or do I need a contractor?+
Hairline cracks under 1/8 inch wide can be sealed with elastomeric caulk by a homeowner. Anything larger — pattern cracks, delamination (where stucco pulls away from the wall), water-damaged areas, or chimney/window leak repairs — requires a licensed contractor. Improper DIY repair on these is the #1 cause of repeat failures because the underlying cause (usually moisture) isn't addressed. California's CSLB requires a license for any stucco work over $500. We're a CSLB-licensed and insured contractor — see our contractor team for credentials.
How do I know if I need stucco repair vs. full re-stucco?+
If less than 30% of an elevation has visible damage, repair is the right call. If you see large areas of cracking, multiple zones of delamination, or the underlying paper and lath have rotted across an entire wall, full re-stucco of that elevation is more cost-effective long-term. Our free assessment includes a moisture survey and lath inspection so you get a defensible recommendation either way — not just a quote pushing whichever option costs more.
Do you offer warranties on stucco work?+
Yes. Stucco Champions provides a written 5-year workmanship warranty on all stucco repairs and a 10-year warranty on full re-stucco. We're a CSLB-licensed and insured contractor (license #1122006 — verifiable at cslb.ca.gov), which means our work is backed by California's contractor licensing board, not just our own promise. Request a free estimate to see the warranty terms in writing before you sign anything.
How long does a stucco repair take?+
Most patch repairs are completed in 1-2 days, including a 24-hour cure time before texture matching and color application. Full re-stucco of a single elevation runs 5-7 working days because each coat (scratch, brown, finish) needs to cure properly before the next is applied. We schedule around weather — California stucco needs daytime temperatures above 50°F with no rain forecast for at least 24 hours after each coat. Our crew shows up on time, every time.