Understanding the Three Coat Stucco System: A Comprehensive Guide
The Gold Standard: Understanding the Traditional Three-Coat Stucco System
Written by Stucco Champions — Southern California’s Authority on Exterior Plastering.
In the world of exterior cladding, trends come and go (vinyl, fiber cement, wood), but one system has stood the test of time for centuries: The Three-Coat Stucco System.
Renowned for its rock-hard durability, fire resistance, and distinct aesthetic, this method is the backbone of Southern California architecture. But what exactly is going on beneath that textured surface?
At Stucco Champions, we believe an educated homeowner is our best customer. Here is the technical breakdown of the system that protects your home.
Free Assessment
Noticing Stucco Damage?
Get a free on-site assessment from a licensed contractor. $0 deposit, no obligation.
GET FREE ASSESSMENTThe Anatomy of a Wall: The Layers Explained
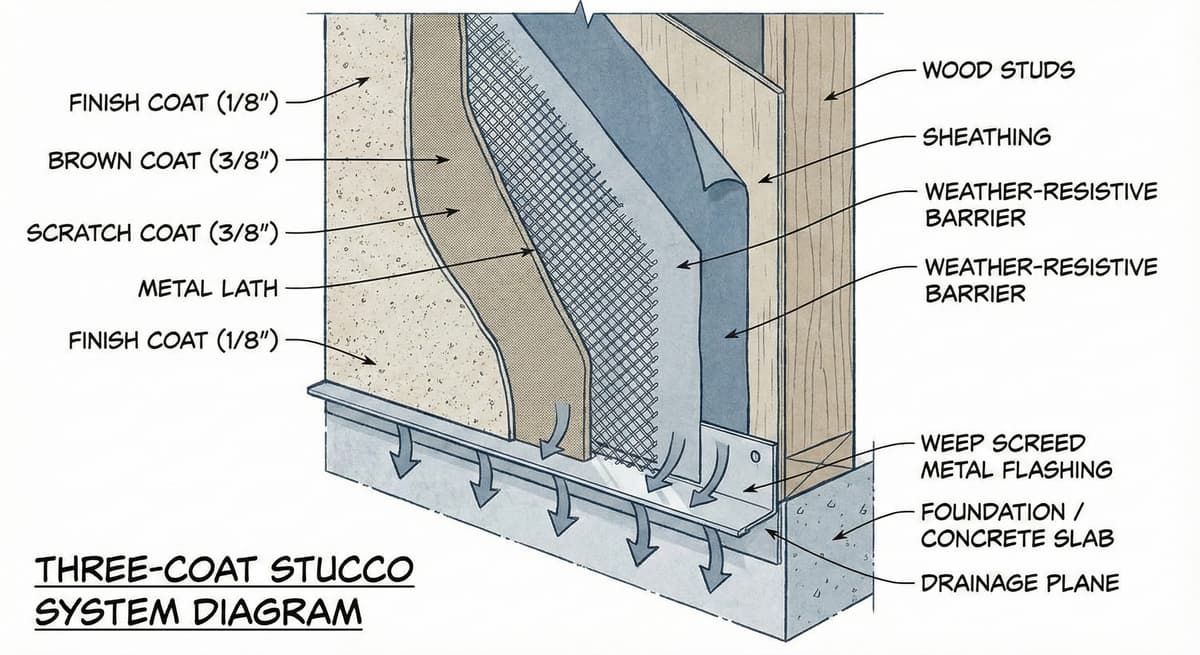
Despite the name, the system actually consists of four critical components (three layers of cement plus the lath). The total system thickness is typically 7/8 of an inch, providing a structural shell for your home.
1. The Lath & Paper (The Hidden Skeleton)
Before any cement is mixed, we must establish the waterproof barrier and mechanical bond.
-
Waterproofing: We install two layers of Grade D Building Paper over the wood sheathing to manage moisture.
-
Wire Mesh: We attach woven wire lath (chicken wire) or expanded metal lath. This metal grid is nailed to the studs, giving the cement something to hold onto.
-
Note: While not one of the "three coats," this is the most critical step for preventing rot.
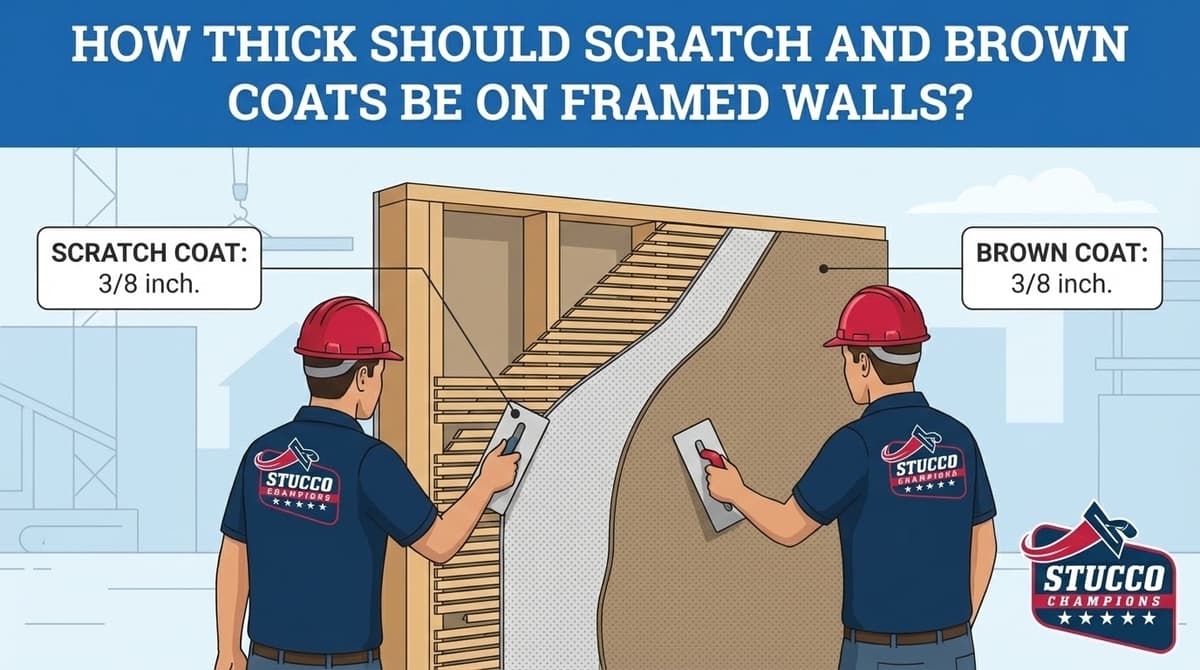
2. The Scratch Coat (The Grip)
-
Composition: A mixture of Portland cement, sand, and water.
-
Thickness: Approximately 3/8 inch.
-
Function: This coat is troweled firmly into the wire mesh to encase it. While wet, we use a scarifier (a rake-like tool) to score horizontal grooves across the surface. These grooves—or "scratches"—provide a mechanical key (grip) for the next layer to stick to.
3. The Brown Coat (The Flattener)
-
Composition: Similar to the scratch coat, but often with slightly more sand for bulk.
-
Thickness: Approximately 3/8 inch.
-
Function: This is the "leveling" layer. The goal here isn't just to add thickness; it is to create a perfectly flat, plumb surface. We use long rods ("rodding") to shave off high spots and fill low spots, correcting any waviness in the wood framing.
4. The Finish Coat (The Beauty)
-
Composition: White cement, lime, fine silica sand, and pigment (color).
-
Thickness: Approximately 1/8 inch.
-
Function: This is the visible layer. It provides the texture (Smooth, Sand, Dash) and the color. It is the first line of defense against the sun and rain.
The Timeline: Why It Takes Time
Unlike siding which goes up in a day, a Three-Coat System requires patience. Cement needs time to cure (harden) chemically.
-
Application: Scratch and Brown coats are often applied back-to-back or within 48 hours.
-
The Cure: Per ASTM C926, the base coats typically need to moist cure (keep wet) for a minimum of 48 hours and settle for 7 days before the finish coat is applied.
-
Why wait? If you apply the finish too soon, the shrinking base coat will crack the finish. Patience prevents cracks.
Three-Coat vs. One-Coat: What is the Difference?
We often get asked, "Can't we just use the One-Coat system?"
-
Three-Coat (Traditional): Solid cement (7/8" thick). superior impact resistance. Better for fire zones. The "purist" choice.
-
One-Coat (Modern): A 1-inch layer of foam insulation board covered by a thin layer of cement (1/2" total).
-
Pros: Higher insulation value (R-Value), lighter weight, faster install.
-
Cons: Less impact resistant (woodpeckers can punch holes in it), feels "hollow" when tapped.
-
Pros and Cons of the Three-Coat System
| Advantages | Disadvantages |
| Durability: Can last 50-80 years with maintenance. | Labor Intensive: Takes longer to install than siding or One-Coat. |
| Fire Resistance: Non-combustible concrete shell (1-hour fire rating). | Rigidity: Prone to hairline cracking if the foundation settles. |
| Aesthetics: Offers the authentic, solid look and feel of masonry. | Weight: Heavier system requires stronger framing. |
Expert Recommendations
While DIY enthusiasts can patch a hole, applying a full three-coat system is a master trade. It requires mixing thousands of pounds of sand and cement to precise ratios and hand-troweling thousands of square feet to a flat tolerance.
When to choose Three-Coat:
-
You are building a custom home or ADU.
-
You are restuccoing an older home that already has 7/8" stucco.
-
You want maximum durability and fire protection.
Conclusion
The Three-Coat Stucco System is not the fastest way to cover a wall, but it is arguably the best. It creates a monolithic, rock-hard envelope that protects your home from the harsh Southern California elements for generations.
At Stucco Champions, we honor this tradition by adhering strictly to code requirements for lathing, mixing, and curing—ensuring your system performs as good as it looks.
—
Ready to Work With a Trusted Stucco Contractor in Los Angeles? Contact Stucco Champions today for a free consultation! Visit us at Stucco Champions for valuable resources and to learn more about our expert stucco repair service
Frequently Asked Questions About Stucco
How much does stucco repair cost in Orange County and Los Angeles?+
Stucco repair typically ranges from $500 for minor crack patching to $5,000+ for full re-stucco of a single elevation. The exact cost depends on the damage type (hairline cracks, water damage, delamination, weep screed failure), the square footage involved, and whether the original three-coat or one-coat stucco system needs to be matched. Stucco Champions provides fixed-price written estimates after a free on-site assessment — no hourly billing, no surprise change orders. See our stucco repair cost guide for detailed pricing by repair type.
How long does stucco last in Southern California?+
Properly installed three-coat stucco lasts 50-80+ years in Southern California's climate. The most common failure points aren't the stucco itself — they're the supporting components: corroded weep screed, deteriorated building paper behind the stucco, and improperly sealed window flashing. Most "stucco failures" are actually moisture-intrusion failures that start at one of these points. Annual visual inspection catches problems before they spread, which is why we offer free weep screed assessments for homeowners in our service area.
Can I repair stucco myself, or do I need a contractor?+
Hairline cracks under 1/8 inch wide can be sealed with elastomeric caulk by a homeowner. Anything larger — pattern cracks, delamination (where stucco pulls away from the wall), water-damaged areas, or chimney/window leak repairs — requires a licensed contractor. Improper DIY repair on these is the #1 cause of repeat failures because the underlying cause (usually moisture) isn't addressed. California's CSLB requires a license for any stucco work over $500. We're a CSLB-licensed and insured contractor — see our contractor team for credentials.
How do I know if I need stucco repair vs. full re-stucco?+
If less than 30% of an elevation has visible damage, repair is the right call. If you see large areas of cracking, multiple zones of delamination, or the underlying paper and lath have rotted across an entire wall, full re-stucco of that elevation is more cost-effective long-term. Our free assessment includes a moisture survey and lath inspection so you get a defensible recommendation either way — not just a quote pushing whichever option costs more.
Do you offer warranties on stucco work?+
Yes. Stucco Champions provides a written 5-year workmanship warranty on all stucco repairs and a 10-year warranty on full re-stucco. We're a CSLB-licensed and insured contractor (license #1122006 — verifiable at cslb.ca.gov), which means our work is backed by California's contractor licensing board, not just our own promise. Request a free estimate to see the warranty terms in writing before you sign anything.
How long does a stucco repair take?+
Most patch repairs are completed in 1-2 days, including a 24-hour cure time before texture matching and color application. Full re-stucco of a single elevation runs 5-7 working days because each coat (scratch, brown, finish) needs to cure properly before the next is applied. We schedule around weather — California stucco needs daytime temperatures above 50°F with no rain forecast for at least 24 hours after each coat. Our crew shows up on time, every time.