

Written by Stucco Champions — Southern California’s Authority on Exterior Plastering.
What Is Stucco Lath? An In-Depth Guide to the Hidden Skeleton
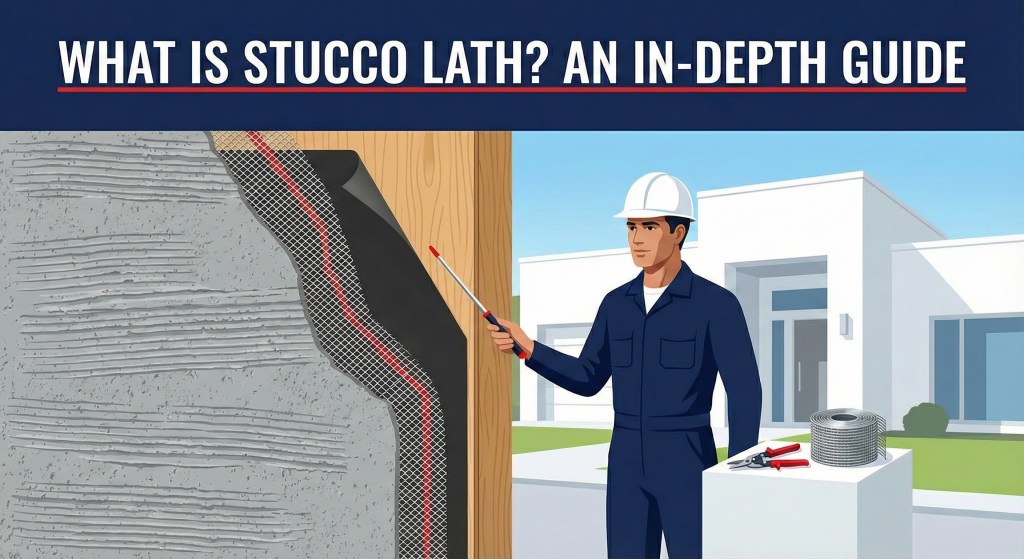
If stucco is the skin of your home, the Lath is the skeleton. Without it, the heavy cement cladding would simply slide off the wall. Lath is the critical reinforcement layer—comprising metal wire, waterproof paper, and flashings—that attaches the stucco to the wood framing.
When homeowners see cracks or bulging stucco, it is rarely a failure of the cement; it is almost always a failure of the lath installation. This guide breaks down the components of a code-compliant lathing system according to ASTM C1063 standards.
1. The Waterproofing Layer: Grade D Paper
Before any metal goes up, we must waterproof the substrate. Stucco is porous; it holds water. The paper behind it is the last line of defense for your wood studs.
- The Standard: We use "Super Jumbo Tex" 60-Minute Grade D paper. It is asphalt-impregnated and highly durable.
- The Two-Ply Rule: California code requires two distinct layers of paper. This creates a "bond breaker"—a tiny air gap between the layers that allows water to drain down to the weep screed instead of soaking into the wood.
2. The Reinforcement: Wire Mesh (The Grip)
Cement cannot stick to smooth plywood. It needs something to grab onto. That is the job of the wire mesh.
Three-Coat System Wire
17-Gauge Woven Wire (Chicken Wire): This is the standard for traditional stucco. It is a heavy-duty galvanized steel mesh that supports the full weight (10-12 lbs/sq ft) of a 7/8" thick wall.
One-Coat System Wire
20-Gauge Woven Wire: This is a lighter, thinner wire used over foam board. Because "One-Coat" stucco is lighter (fiber-reinforced), it requires less heavy steel support.
You cannot staple flat wire tight against the paper. The cement needs to get behind the wire to encapsulate it. We use Self-Furring Lath, which has small crimps or dimples that hold the wire 1/4 inch away from the wall, allowing for full embedment.
3. Metal Flashings: The Transitions
Lath isn't just wire; it's also the rigid metal trims that define the edges of your home.
- Weep Screed: Installed at the foundation line. It holds the stucco off the ground and lets water drain out. (Read our Weep Screed Guide).
- Plaster Stop (Casing Bead): A J-shaped metal strip installed around doors and windows to create a clean, straight edge where the stucco stops.
- Corner Aid: A reinforced metal nose installed on outside corners to create a straight, impact-resistant vertical line.
4. Fasteners: Staples vs. Nails
How do we attach this steel skeleton to the wood?
- Pneumatic Staples: The industry standard. We use wide-crown (1-inch) galvanized staples driven by compressed air. They are fast and provide excellent holding power.
- Furring Nails: Hand-driven nails with a cardboard or plastic spacer washer. These are slower but useful for small repairs where a compressor isn't available.
Conclusion: It’s What’s Inside That Counts
A beautiful finish coat means nothing if the lath underneath is rusting or loose. The lathing phase is the most critical inspection point in the entire stucco process. By using double-ply paper, self-furred wire, and proper flashings, Stucco Champions ensures the skeleton of your home will last for decades.
Last week, we shared Understanding Stucco Staple Guns. Learn about the tools used to secure the lath.
Need stucco repair in Southern California? Stucco Champions proudly serves homeowners throughout Orange County, Los Angeles, Riverside, and San Bernardino counties. Check out our Service Areas page to see all the cities we cover.