Applying Stucco to Metal Buildings: An Expert Guide
Written by Stucco Champions — Southern California’s Authority on Exterior Plastering.
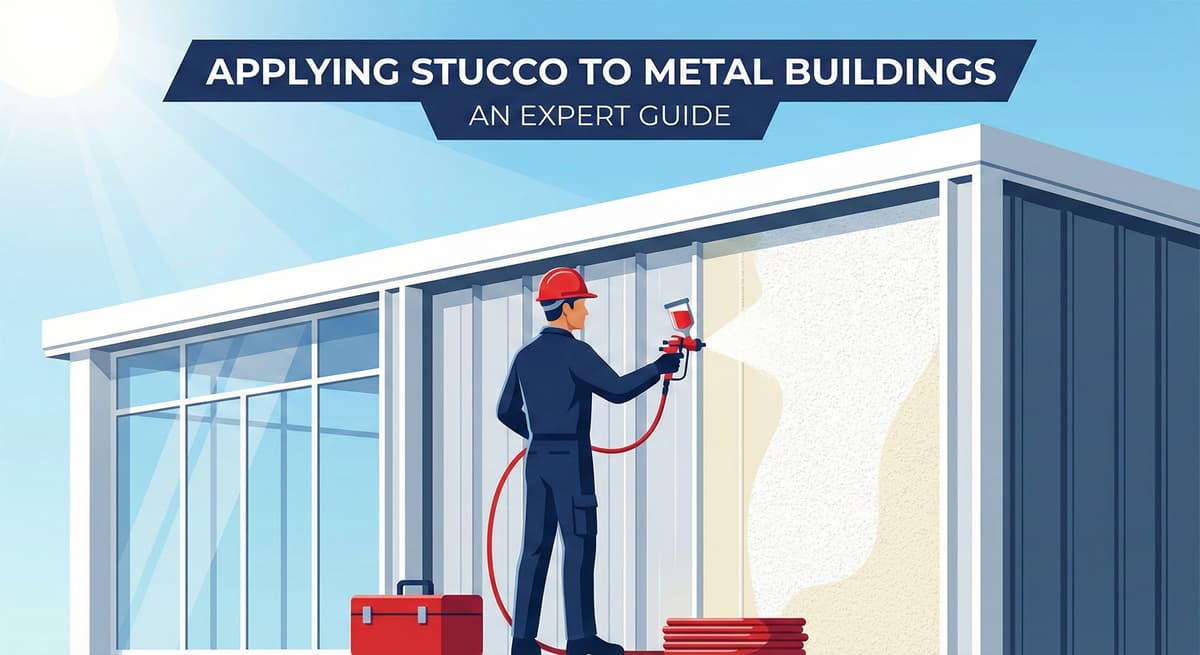
Applying Stucco to Metal Buildings: An Expert Guide to Load & Deflection
Metal buildings—whether prefab sheds, workshops, or commercial steel structures—are prized for durability but often criticized for their industrial appearance. The most common question we get is: "Can I stucco over this metal siding to make it look like my house?"
The short answer is Yes. However, treating a metal building like a wood-framed house is a recipe for disaster. Metal expands in heat, vibrates in wind, and has different load-bearing capacities. This guide explains the engineering required to make the bond last.
1. The Weight Problem: 12 lbs vs. 6 lbs
Before applying a single trowel of cement, you must determine if your metal frame can hold the weight.
- Traditional 3-Coat Stucco: Weighs approximately 10-12 lbs per square foot. Most lightweight prefab sheds cannot support this load without buckling.
- One-Coat / Foam System: Weighs approximately 4-6 lbs per square foot. This is the preferred method for metal structures.
⚠️ Structural Check
If you are stuccoing a heavy-gauge "Red Iron" steel building (40x60 commercial), it can likely handle a 3-coat system. If you are stuccoing a thin-gauge "Sheet Metal" shed from Home Depot, you must use a lightweight One-Coat or EIFS system to prevent collapse.
Free Assessment
Noticing Stucco Damage?
Get a free on-site assessment from a licensed contractor. $0 deposit, no obligation.
GET FREE ASSESSMENT2. The Insulation Solution (R-Value)
Metal transfers heat instantly. Without insulation, a stuccoed metal building will be an oven in summer and a freezer in winter.
The Fix: We install 1-inch or 1.5-inch EPS Foam Board over the metal skin before lathing.
This serves two purposes:
1. Insulation: It creates a thermal break, drastically improving energy efficiency.
2. Isolation: It separates the rigid stucco from the expanding/contracting metal skin, preventing thermal cracking.
3. Fastening: Self-Tapping Screws
You cannot use nails on a metal building. You must use Self-Tapping Ceramic Coated Screws with washers.
The Protocol:
1. Attach the foam board through the metal ribs into the structural purlins (studs) using heavy-gauge screws.
2. Install the wire lath through the foam, ensuring the fasteners bite into the steel frame, not just the thin metal siding.
4. Deflection: Why Metal Cracks Stucco
Metal walls flex (deflect) in the wind more than wood walls. If you apply brittle cement over a flexing wall, it will crack.
The Flexible Solution
We almost exclusively recommend an Acrylic Finish for metal buildings. Acrylics are polymer-based and have "elastomeric" properties, meaning they can stretch slightly. This allows the finish to absorb the vibration and wind deflection of the metal building without developing hairline fractures.
5. The Application Process
Once the engineering is solved, the application follows a specific sequence:
- Layer 1: Tyvek StuccoWrap or Grade D Paper (to prevent galvanic corrosion between the steel building and the wire lath).
- Layer 2: EPS Foam Board (optional but recommended).
- Layer 3: Self-Furred Wire Lath screwed into structural members.
- Layer 4: Fiber-Reinforced Base Coat (adds strength).
- Layer 5: Acrylic Finish Coat.
Conclusion: It’s an Engineering Project
Stuccoing a metal building turns a utility structure into a permanent architectural feature. However, it requires respecting the weight limits and thermal movement of steel. By using a lightweight foam system and acrylic finish, Stucco Champions ensures your metal building looks like a custom home.
Related Resources
Last week, we shared Can You Stucco a Mobile/Modular Home?. Similar engineering principles apply regarding weight and chassis movement.
Frequently Asked Questions About Stucco
How much does stucco repair cost in Orange County and Los Angeles?+
Stucco repair typically ranges from $500 for minor crack patching to $5,000+ for full re-stucco of a single elevation. The exact cost depends on the damage type (hairline cracks, water damage, delamination, weep screed failure), the square footage involved, and whether the original three-coat or one-coat stucco system needs to be matched. Stucco Champions provides fixed-price written estimates after a free on-site assessment — no hourly billing, no surprise change orders. See our stucco repair cost guide for detailed pricing by repair type.
How long does stucco last in Southern California?+
Properly installed three-coat stucco lasts 50-80+ years in Southern California's climate. The most common failure points aren't the stucco itself — they're the supporting components: corroded weep screed, deteriorated building paper behind the stucco, and improperly sealed window flashing. Most "stucco failures" are actually moisture-intrusion failures that start at one of these points. Annual visual inspection catches problems before they spread, which is why we offer free weep screed assessments for homeowners in our service area.
Can I repair stucco myself, or do I need a contractor?+
Hairline cracks under 1/8 inch wide can be sealed with elastomeric caulk by a homeowner. Anything larger — pattern cracks, delamination (where stucco pulls away from the wall), water-damaged areas, or chimney/window leak repairs — requires a licensed contractor. Improper DIY repair on these is the #1 cause of repeat failures because the underlying cause (usually moisture) isn't addressed. California's CSLB requires a license for any stucco work over $500. We're a CSLB-licensed and insured contractor — see our contractor team for credentials.
How do I know if I need stucco repair vs. full re-stucco?+
If less than 30% of an elevation has visible damage, repair is the right call. If you see large areas of cracking, multiple zones of delamination, or the underlying paper and lath have rotted across an entire wall, full re-stucco of that elevation is more cost-effective long-term. Our free assessment includes a moisture survey and lath inspection so you get a defensible recommendation either way — not just a quote pushing whichever option costs more.
Do you offer warranties on stucco work?+
Yes. Stucco Champions provides a written 5-year workmanship warranty on all stucco repairs and a 10-year warranty on full re-stucco. We're a CSLB-licensed and insured contractor (license #1122006 — verifiable at cslb.ca.gov), which means our work is backed by California's contractor licensing board, not just our own promise. Request a free estimate to see the warranty terms in writing before you sign anything.
How long does a stucco repair take?+
Most patch repairs are completed in 1-2 days, including a 24-hour cure time before texture matching and color application. Full re-stucco of a single elevation runs 5-7 working days because each coat (scratch, brown, finish) needs to cure properly before the next is applied. We schedule around weather — California stucco needs daytime temperatures above 50°F with no rain forecast for at least 24 hours after each coat. Our crew shows up on time, every time.