Stuccoing Cinder Block After Rain: The SSD Moisture Guide
In Southern California, our rainy season is short but intense. For homeowners and masonry contractors mid-project, a soaked cinder block (CMU) wall presents a critical decision: Do we apply the scratch coat now, or do we wait?
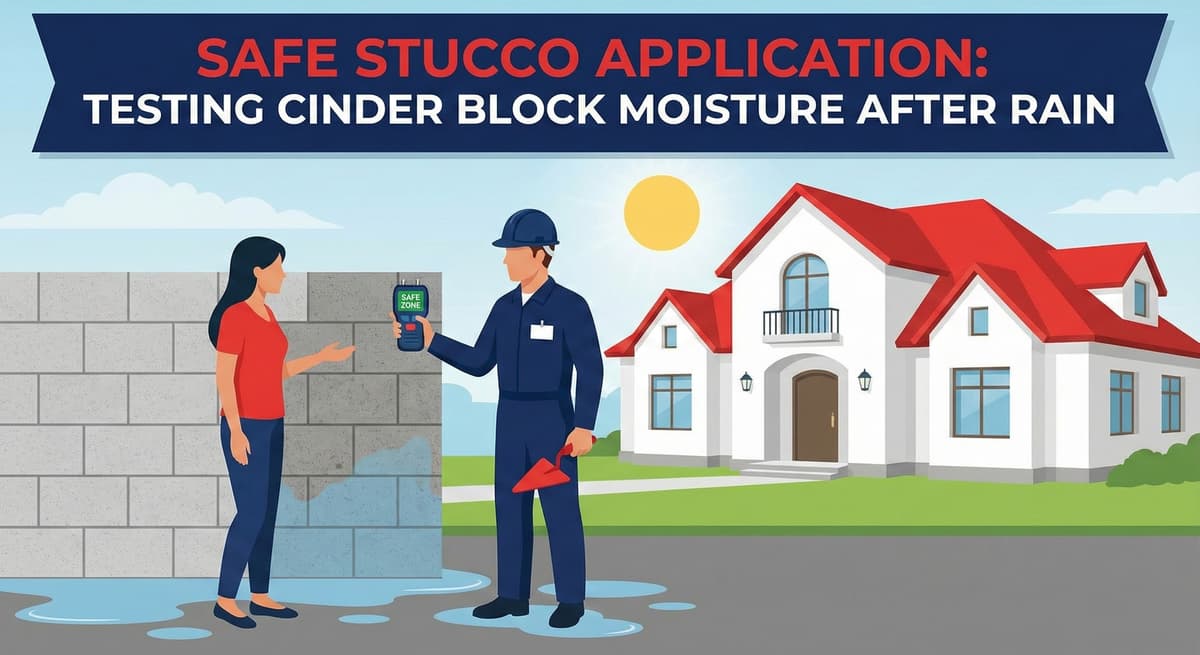
Applying wet stucco to a saturated masonry wall is a massive gamble. If the block is too wet, the bond fails, and the heavy stucco slides right off. If the block is too dry, it acts like a sponge, sucking the moisture out of the mix and causing catastrophic cracking. This guide explains the science of the SSD (Saturated Surface Dry) condition and how to precisely determine if your wall is ready for cement.
1. The Physics of Bonding: Why Moisture Matters
Stucco adheres to cinder block through a combination of physical mechanical keying and chemical bonding.
- Too Wet: If the block is completely saturated, its internal pores are 100% full of water. The new wet stucco cannot penetrate the surface to create a grip. This leads to "slumping" (sliding down the wall) and eventual delamination.
- Too Dry: Cinder block is a highly porous sponge. If it is bone dry and sitting in the hot sun, it will instantly suck the hydration water out of your wet stucco mix. This "flash drying" instantly stops the chemical cure, leaving you with a weak, powdery, crumbly coat that will flake off.
Free Assessment
Noticing Stucco Damage?
Get a free on-site assessment from a licensed contractor. $0 deposit, no obligation.
GET FREE ASSESSMENT2. The Diagnostic: Is It Ready?
You cannot judge moisture just by looking at the wall; you have to test it. We look for the "Goldilocks" zone.
The Splash Absorption Test
Splash a cup of clean water against the block face.
- Result A: The water runs straight down the face without soaking in.
Verdict: Too Wet (or Sealed). Do not apply stucco. The internal pores are already full of rainwater. - Result B: The water absorbs instantly into the block and the dark spot dries in 3 seconds.
Verdict: Too Dry. You must heavily mist the entire wall with a hose before application to prevent flash drying. - Result C: The water absorbs, turning the block dark, but the surface sheen disappears steadily over 30 seconds.
Verdict: Perfect (SSD Condition). This is the ideal state for bonding. The inside of the block is damp, but the surface is dry enough to pull the cement in.
Heavy rain brings natural salts from inside the concrete to the surface. If you see a white, chalky powder blooming on the block after it dries, this is Efflorescence. You must remove this before stuccoing. If you apply a base coat over these salts, the chemical bond will fail instantly. Scrub the wall with a stiff bristle brush and a mild masonry cleaner before proceeding.
3. The Application Protocol
Once the moisture level is correct (SSD), you proceed with a Direct-Apply stucco system.
Step A: The Bonding Agent
Even if the moisture feels perfect, we highly recommend insurance. Apply a liquid chemical bonding agent (like Weld-Crete) or a "dash coat" (a very wet cement slurry) directly to the block. This adhesive ensures the new stucco sticks even if the block moisture varies wildly across the wall (e.g., the top is dry, but the bottom is wet).
Step B: The Fiber-Reinforced Base
Do not use standard, cheap plastic mortar. You must use a Fiber-Reinforced Stucco Base (like Omega or Quikrete).
Why? Cinder block walls have mortar grout lines. These lines absorb water differently than the block face. This frequently causes "telegraphing" (grid-pattern cracking) in the final finish. The fiberglass strands mixed into the base coat act as a tensile bridge, preventing these grid cracks from transferring to the surface.
Step C: The Scratch
Apply the base coat approximately 3/8" thick. While it is still wet, run a scarifier (scratch tool) horizontally across the surface. This creates deep grooves (a mechanical key) which is absolutely essential for the finish color coat to hang onto later.
Conclusion: Respect the Sponge
A cinder block wall is a sponge. Managing exactly how much water is inside that sponge determines the entire success of your stucco job. If it rained yesterday, run the absorption test today. Ideally, you want a damp interior but a dry surface (SSD) to guarantee a bond that lasts 50 years.
Frequently Asked Questions About Stucco
How much does stucco repair cost in Orange County and Los Angeles?+
Stucco repair typically ranges from $500 for minor crack patching to $5,000+ for full re-stucco of a single elevation. The exact cost depends on the damage type (hairline cracks, water damage, delamination, weep screed failure), the square footage involved, and whether the original three-coat or one-coat stucco system needs to be matched. Stucco Champions provides fixed-price written estimates after a free on-site assessment — no hourly billing, no surprise change orders. See our stucco repair cost guide for detailed pricing by repair type.
How long does stucco last in Southern California?+
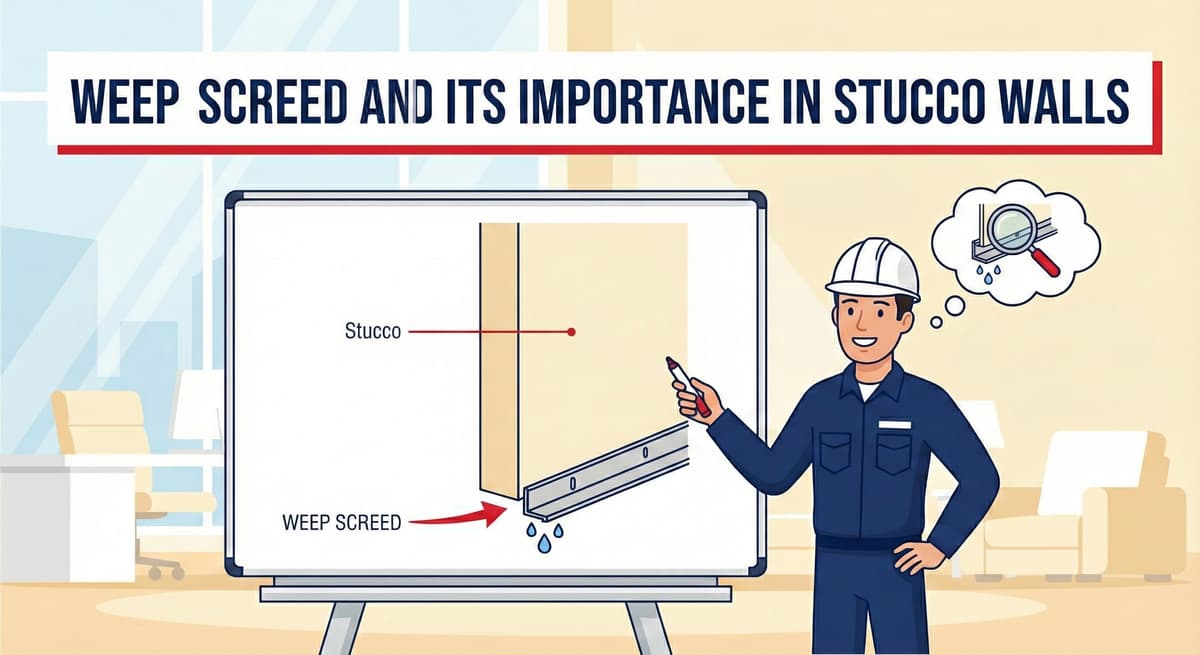
Properly installed three-coat stucco lasts 50-80+ years in Southern California's climate. The most common failure points aren't the stucco itself — they're the supporting components: corroded weep screed, deteriorated building paper behind the stucco, and improperly sealed window flashing. Most "stucco failures" are actually moisture-intrusion failures that start at one of these points. Annual visual inspection catches problems before they spread, which is why we offer free weep screed assessments for homeowners in our service area.
Can I repair stucco myself, or do I need a contractor?+
Hairline cracks under 1/8 inch wide can be sealed with elastomeric caulk by a homeowner. Anything larger — pattern cracks, delamination (where stucco pulls away from the wall), water-damaged areas, or chimney/window leak repairs — requires a licensed contractor. Improper DIY repair on these is the #1 cause of repeat failures because the underlying cause (usually moisture) isn't addressed. California's CSLB requires a license for any stucco work over $500. Looking for a highly-rated stucco contractor in Southern California? We are a CSLB-licensed and insured team ready to help.
How do I know if I need stucco repair vs. full re-stucco?+
If less than 30% of an elevation has visible damage, repair is the right call. If you see large areas of cracking, multiple zones of delamination, or the underlying paper and lath have rotted across an entire wall, full re-stucco of that elevation is more cost-effective long-term. Our free assessment includes a moisture survey and lath inspection so you get a defensible recommendation either way — not just a quote pushing whichever option costs more.
Do you offer warranties on stucco work?+
Yes. Stucco Champions provides a written 5-year workmanship warranty on all stucco repairs and a 10-year warranty on full re-stucco. We're a CSLB-licensed and insured contractor (license #1122006 — verifiable at cslb.ca.gov), which means our work is backed by California's contractor licensing board, not just our own promise. Request a free estimate to see the warranty terms in writing before you sign anything.
How long does a stucco repair take?+
Most patch repairs are completed in 1-2 days, including a 24-hour cure time before texture matching and color application. Full re-stucco of a single elevation runs 5-7 working days because each coat (scratch, brown, finish) needs to cure properly before the next is applied. We schedule around weather — California stucco needs daytime temperatures above 50°F with no rain forecast for at least 24 hours after each coat. Our crew shows up on time, every time.